Introduction to our project
In late June, I started working with a team of 3 other students on a project for the Supergen Bioenergy Hub, who work with academia, industry, government and societal stakeholders to develop sustainable bioenergy systems that support the UK’s transition to an affordable, resilient, low-carbon energy future!
We were asked to develop an app that would help the organisation to promote their research at conferences and to make their research more accessible to the general public.
After taking a look at the requirements given to us by the organisation and the features they had requested, we had to think about the data that we’d need (which was quite extensive!) to make these features a reality. Some features would require working with large spreadsheets of data and calculations, and in others we’d be using articles written by experts and images outputted from researchers at the organisation.
In addition to the challenge of developing these features in general, figuring out the best way to manage this data was also a significant challenge in itself. We had to make sure the data was easy to “plug in” to our application from a technical point of view, but also that it was easy enough for the researchers at Supergen Bioenergy Hub to alter at a later date. This is where Netlify CMS comes in!
Netlify CMS
We were already planning on using Netlify to deploy our application, a cloud company specialising in automating and hosting web applications (meaning we wouldn’t have to set up our own server for doing this!)
We found this to be a very positive experience. We could build and deploy all of our Git branches separately with Netlify, allowing us to share a link with our client to the stable and finalised features of each iteration, while allowing us to generate links for experimental features that we could share with each other when testing and reviewing code.
Now that we had figured out how to deploy our application, we also had to start thinking about solving our content/data management problem. I’d heard of Netlify CMS before (but had never used it), so I had a look into this and how it would fit our project. We found that this solution met all the criteria we had.
Ease of use
Perhaps the biggest advantage of Netlify CMS was its ease of use, for both us and our client. The client just had to navigate to the correct address, sign in, and then they were able manage the content displayed in the app pretty easily. The whole process is very intuitive and doesn’t confuse the end-user (our client) with any technical jargon!
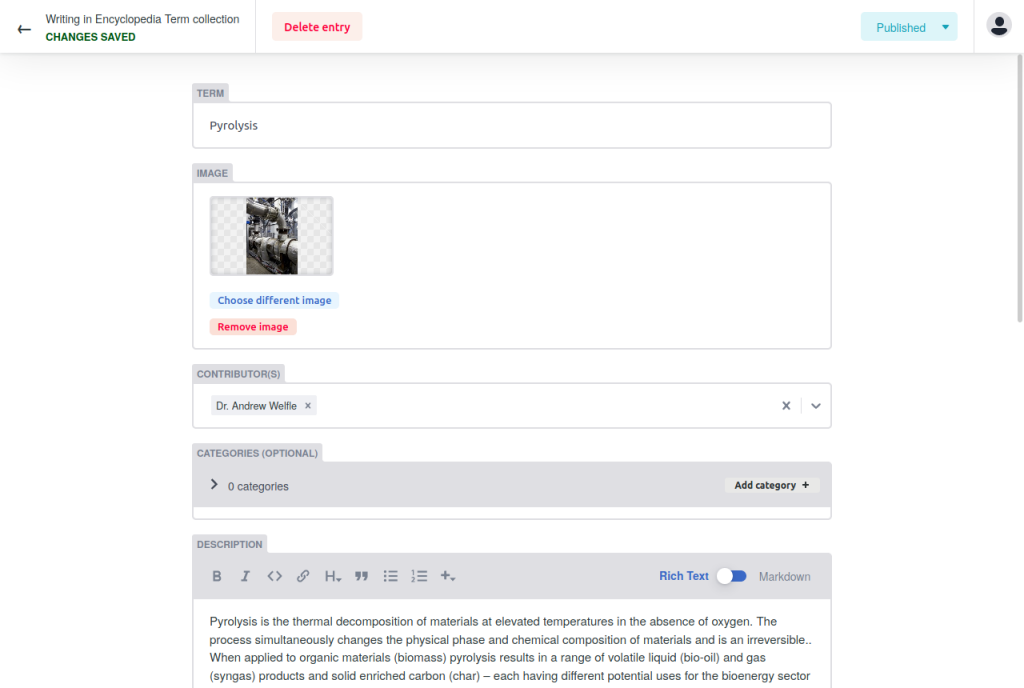
From a technical point of view, setting up Netlify CMS was very simple. They offer great official documentation, and creating this article editor was as easy as writing a few lines of text in a YAML configuration file – that’s it! The CMS set up all the required pages and forms for us.
Overall, setting up the CMS was really easy, and the process to get our client familiar with it took no time at all. This allowed us to spend our time more productively and implement some of the more important features!
Extensibility
Given the nature of our project, we knew that some features required “specialised” data – which I count as data that can’t be easily or meaningfully represented with a few text fields or images.
Our “Bioenergy Case Studies” feature is an example of this. This feature was all about representing the different research outputs (case studies) from Supergen Bioenergy Hub. Each case study was to be displayed on the same graph/chart so that the user is able to compare and contrast the different case studies, and to also see what areas the hub is doing research in.
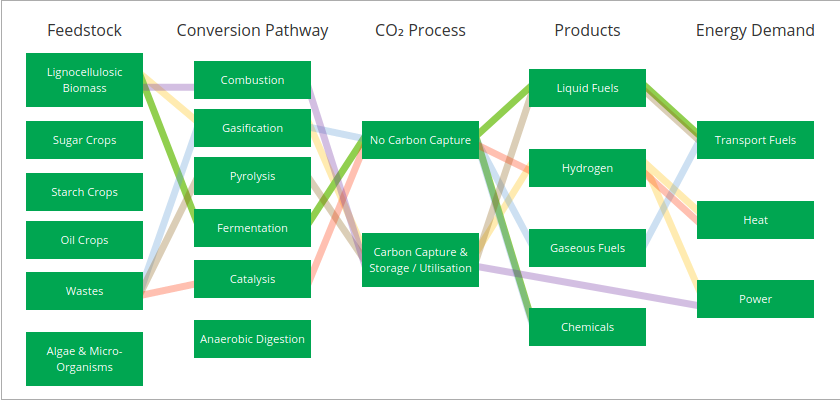
The case studies were to be inputted by the researchers at the hub themselves. This presented a problem – how could we make an easy-to-use interface to do this using the widgets that Netlify CMS has built-in? We couldn’t (and shouldn’t!) expect the researchers to type in each edge of the graph in a text box as this is tedious and error-prone.
Thankfully, Netlify CMS is very extensible. You can create your own widgets using HTML/CSS/JavaScript, or by creating your own React components. I was able to replicate the same “graph” on the CMS by creating a custom widget that allows the user to click on nodes to create edges, and to click on edges to delete them.
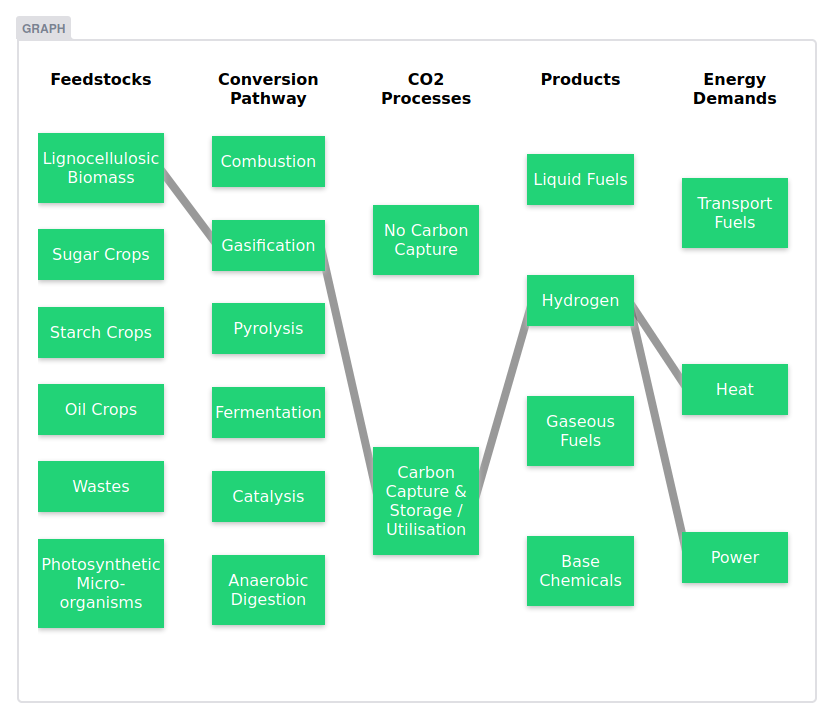
This graph is then stored as a list of edges in JSON:
"graph": [
  [
    "Lignocellulosic Biomass",
    "Gasification"
  ],
  [
    "Gasification",
    "Carbon Capture & Storage / Utilisation"
  ],
  [
    "Carbon Capture & Storage / Utilisation",
    "Hydrogen"
  ],
  [
    "Hydrogen",
    "Heat"
  ],
  [
    "Hydrogen",
    "Power"
  ]
]
This solution gave us confidence that the client would easily be able to add new graphs without having to ask us or type in lists of edges – it’s just a graphical editor!
In terms of extensibility, if the default widgets that Netlify CMS comes with aren’t enough for you, then it’s a simple process to create your own. You get complete control over how the widget looks and works, as well as how the widget’s data is represented when saved. This is something that was crucial to our project.
Integrating it with our app
One of the coolest features of the CMS is that changes are made as Git commits to a repository that you specify. This gives you a nice side-effect of being able to view the history of your content over time, and roll it back if something goes wrong.
Data is saved in JSON files (this is configurable to support many other formats), and because of this it was really easy to plug straight into our React application. I wrote a few scripts that just pulled the latest JSON files from the CMS, and then the React app used those as its source of data. This gave us the advantage of being able to work around dummy data in the beginning, and then very quickly and effortlessly update this data with “real” data.
Additionally, hosting on Netlify also allows us to run scripts before deploying the data. One thing we did here was to run a script to optimise images uploaded to the CMS before serving them.
Some not-so-good parts
We encountered a few minor issues with Netlify CMS, but we were able to come up with workarounds pretty easily.
One issue was the Rich Text Editor’s lack of a builtin table editor. You could paste in a Markdown table and it would then be created, but that’s quite clunky and not inuitive for a non-technical user. We got around this by making a component for the most frequently used table, and then the remaining tables were created by just pasting in Markdown tables. Hopefully Netlify can add this soon, as it seems like one of the basics that everyone expects!
The other issue was its “Editorial Workflow”. This allows changes to be staged and made as merge/pull requests, then reviewed and approved, and then accepted and merged in. This would have been useful for drafting articles for our encyclopedia, however at the time of writing, this feature is only stable on GitHub and unstable elsewhere. Running on GitLab, we found a few issues in moving content along this process of drafting, review, and creation. Sometimes content just “disappeared” while still being visible in the repository.
This was unacceptable for us to work with, so we just disabled editorial workflow as we felt like this functionality wasn’t crucial. However, once this does become stable I’m sure it would give our client a lot more confidence in making changes and having others being able to review them.
Conclusion
Overall, working with Netlify CMS has been a really positive experience. It never felt like we were having to work around the CMS; it just fit perfectly into our application and we spent minimal time setting it up. Our client was also able to pick it up very quickly and be productive with it, which was crucial for our time-limited project.
For basic content (e.g. a few articles, lists of data, and even simple relations) Netlify CMS has you covered with its in-built functionality. If you need something a bit more advanced like we did, then it also has you covered with its easy-to-use but comprehensive Widget API, where you can create virtually anything you need; Netlify CMS shines in how it adapts to fit your needs.
If you’re looking for a CMS, then I highly recommend you take a look at Netlify CMS just because of how easy it is to use, but also how powerful its features are.