This summer, I set up and managed a Continuous Integration system for the company using GitLab’s CI system, on the company’s development Virtual Machine. This article discusses CI/CD and serves as a step by step guide documenting how I set it up, the issues I faced, and how I tackled them.
GitLab.com offers its own Continuous Integration/Delivery/Deployment (CI/CD) solution. The Supergen team used it mostly for automated testing, so that’s what I’ll focus on in this article. First of all, some quick definitions:
- A pipeline is a series of operations or processes that data is sent through one after another.
- Continuous Integration is the process of regularly integrating new features, bug fixes and more into the main branch of the codebase. This avoids the hassle caused by dozens of branches being merged just before a release. CI focuses heavily upon automated testing, so you know instantly if merging something would cause issues.
- Continuous Delivery is the ability to deploy at any time, through a simple process. Your pipeline will create a deployable build that’s ready to be released. All it takes from you is an approval, and it’ll be released.
- Continuous Deployment is the same as Continuous Delivery, but with the pipeline deploying automatically, so all you do is push your code and everything else is handled.
So, the CI/CD pipeline looks like this:
- Code gets pushed to a branch
- Branch is tested by CI system
- If tests fail, it notifies the developers and the code doesn’t move any further through the pipeline
- If they pass, it merges into the main branch on the CI system before testing the merged code to ensure it doesn’t introduce any issues. Again, this will notify the developers if tests fail
- If the merged code passes all its tests, then the CD system creates a production build of the main branch (and deploys it if you’re using Continuous Deployment)
The tool we used for CI is GitLab Runner. It integrates with GitLab’s website so you can see the status of your builds and tests as they run. Setting this up is a fairly simple process.
Installing GitLab Runner
Here’s how I installed GitLab Runner on the Imago dev virtual machine. This is mostly based on the official instructions from GitLab, with some workarounds that were particular to this machine due to its network restrictions.
The following commands (assuming a Debian based Linux distribution) will install everything you need for GitLab Runner:
sudo apt-get install curlinstalls the tool we use to download from the internet from the command linecurl -L https://packages.gitlab.com/install/repositories/runner/gitlab-runner/script.deb.sh | sudo bashdownloads the script at that page and runs it in bash with superuser permissions
At this point, I received a curl error:
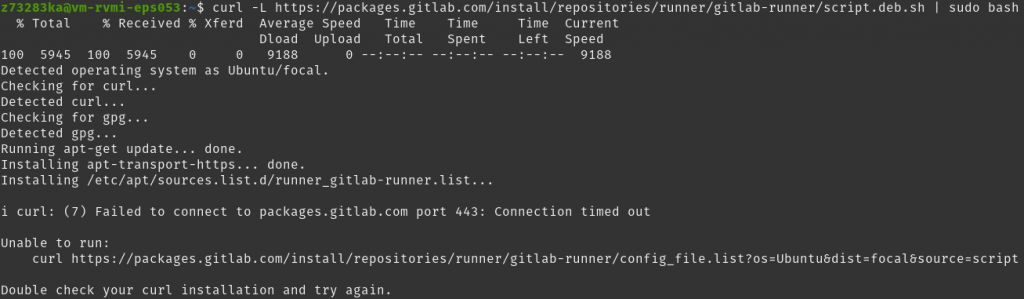
Curling the URL that caused the error gave me a 404 page, indicating that something was wrong with the URL:
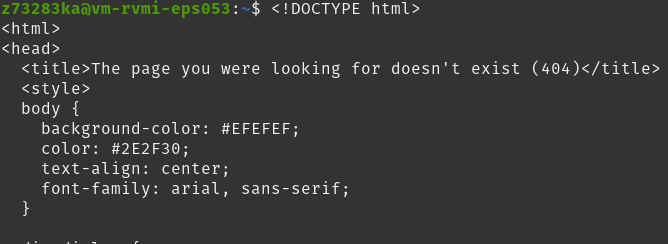
When I visited the page from a browser on a different machine though, it worked fine:

This indicates that the issue is with the VM’s network configuration, rather than the packages.gitlab.com link. So I decided to download the install script from GitLab without piping directly to bash, instead saving in a local file called glrunner:
curl -L https://packages.gitlab.com/install/repositories/runner/gitlab-runner/script.deb.sh >> glrunnerI then made the script file executable and ran it:
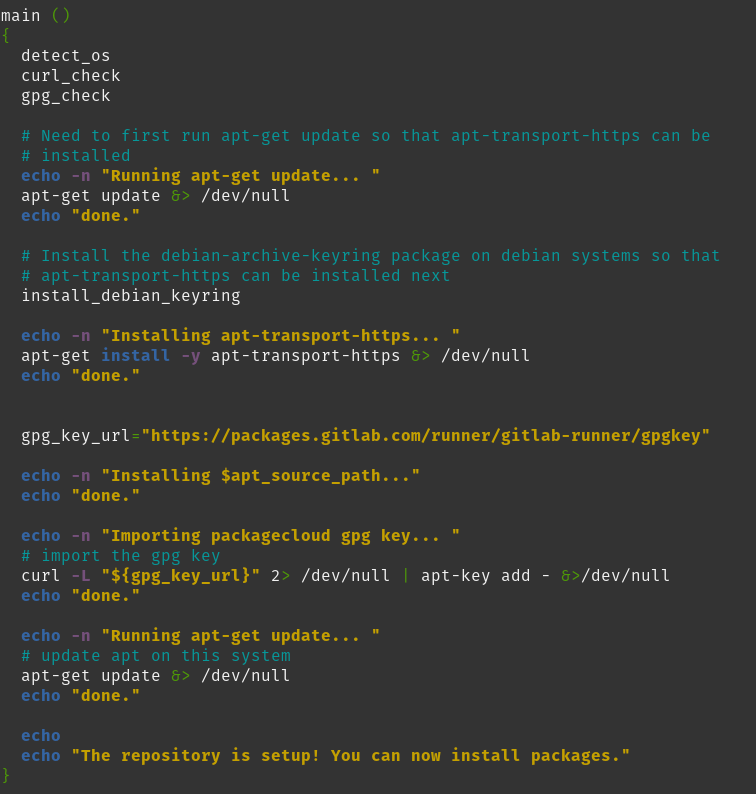
chmod +x glrunner && sudo ./glrunnerAs expected, this gives the same curl error as before, since all we’ve done so far is run the script like we already did. But when I opened the script in an editor and looked around, I saw how it worked and what the curl that was breaking was used for. The script curls that URL and stores its contents in an apt source file:

Since curl is failing but we can access the page from a browser on a different machine, we can manually edit the source file:
sudo nano /etc/apt/sources.list.d/runner_gitlab-runner.listThen we paste in the content from the website and save it. Once this is done, we can continue with the install script. In the local version we saved (~/glrunner in my case), we can remove the lines of code that execute the breaking curl and store it in the sources file. This leaves the main() function of the script as follows:
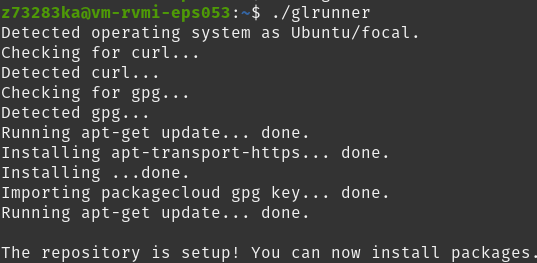
We can now save the script and execute it, which succeeds:
Now we install the GitLab GPG key for certification so we can update and install from the repository we just added:
curl --silent https://packages.gitlab.com/gpg.key | sudo apt-key add -Then we apt update and install GitLab Runner:
sudo apt-get update && sudo apt-get install gitlab-runner -yWe can verify the installation by checking the status of gitlab-runner:

Registering the Runner
The next step is to register a runner with GitLab CI so it can be given jobs. The instructions on the official site are all you need for this. I set the Imago Dev Runner up as a group runner, so it’ll pick up jobs from any project in the company’s GitLab group.
Remember to set up a config template file when registering the runner. This will allow you to change settings easily later on. The default config location is /etc/gitlab-runner/config.toml, which you’ll have to pass to the register command as follows:
sudo gitlab-runner register --template-config /etc/gitlab-runner/config.tomlI passed it the parameters shown below when asked to (token redacted as it’s sensitive information):
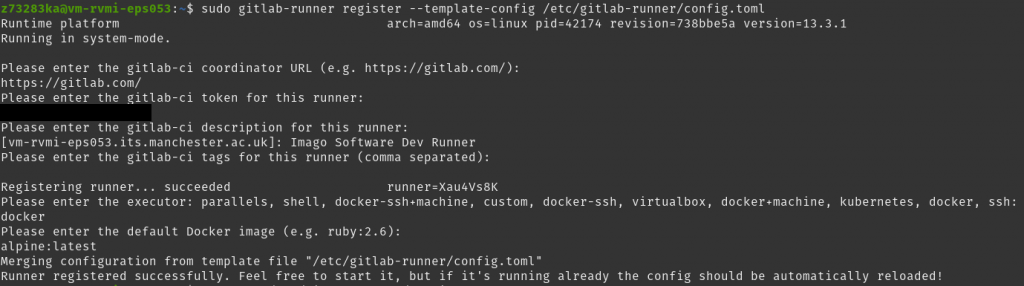
I selected the docker executor, so this runner will build a docker container based off of the image you define in your repo’s gitlab-ci.yml file and run all the tests in that container. I set it to default to the latest available version of alpine, a lightweight linux distribution that’s perfect for quick container spin-ups. The –template-config flag tells the runner where to store its configuration details. The config file after registering looks like this:
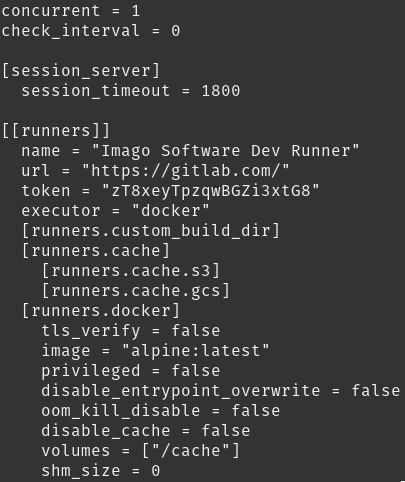
The GitLab docs detail these settings and what they do. Now the runner is registered, sudo gitlab-runner run & will start it (as a detached process). It should show up in the repository under Group Runners, as in the image below. Once it does, it should be ready to pick up jobs!

Summary
This article has discussed what Continuous Integration, Delivery and Deployment are, and outlined the process of creating and registering a GitLab runner. I have also highlighted some issues specific to our server that I had to work around, in case anyone who works on it in the future is faced with the same problems. Continuously testing code is vital to creating stable, quality software, and this summer has given me a great experience in setting up a full test pipeline on a server.